How Field-Tested Improvisation Saved Lives—and What Every Backcountry Traveler Must Know
Wilderness first aid risk management saved a life one afternoon when a backcountry emergency turned critical.
What began as a routine backcountry navigation exercise quickly turned into a real-world test of wilderness first aid risk management. Initially, the skies were clear, the weather stable, and a small group of men were moving confidently through rugged terrain. Then, without warning, the situation unraveled completely.
During a river crossing, one participant misjudged the current. Within seconds, he was swept downstream, slammed into a submerged rock, and thrown onto the far bank. Subsequently, he landed hard—with a compound fracture to his left radius. Bone was visible. Blood was pouring out. Meanwhile, shock was setting in fast.

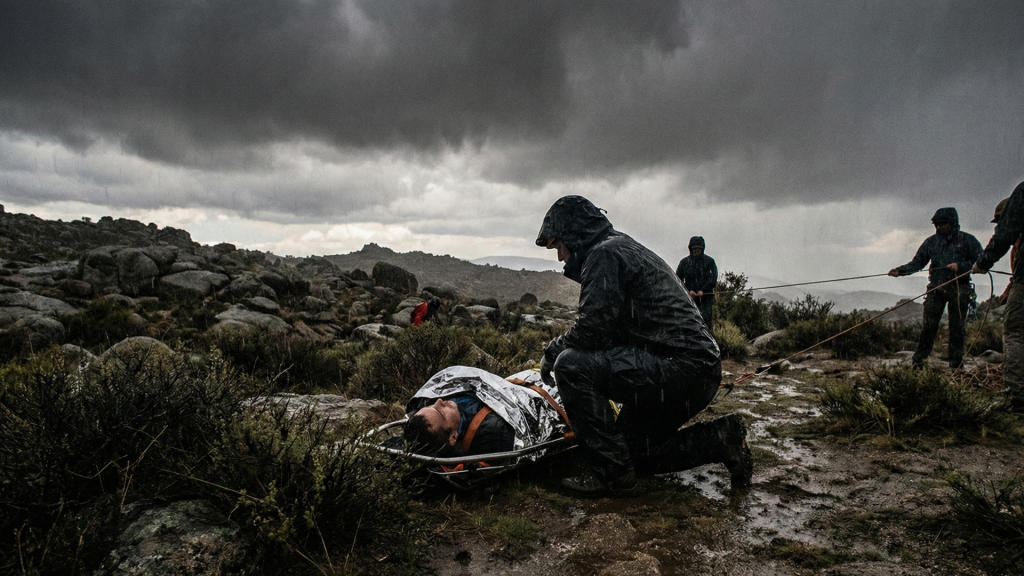
Unfortunately, the nearest medical facility was a four-hour helicopter flight away—and that was only if weather allowed. To make matters worse, the comprehensive first aid kit had vanished downstream with his pack. (Learn how to properly pack and secure your bug-out bag essentials.) Ultimately, what remained were three things: training, mindset, and the natural environment.
When Your First Aid Kit Disappears
Moments like this reveal a fundamental truth about wilderness first aid risk management—especially when no medical kit is available. Indeed, in wilderness first aid, your most important tool isn’t what’s in your pack—it’s what’s between your ears.
In this article, I’ll share a systematic approach to wilderness first aid risk management developed over fifteen years of corporate risk management and extensive backcountry travel. Furthermore, you’ll learn how to manage the eight most common outdoor injuries using improvised tools and natural materials. For a complete overview of essential wilderness skills beyond first aid, check out our beginner’s guide to wilderness survival.
The Wilderness First Aid Risk Management Mindset: Principles Under Pressure
During my previous career managing power generation facilities, I learned that effective emergency response starts long before anything goes wrong. Moreover, the same principle applies even more strongly in wilderness first aid risk management, where your decisions are shaped by constraints that don’t exist in an urban emergency room.
The Three Critical Constraints in Wilderness First Aid Risk Management
1.Time Constraint in Wilderness First Aid
In the backcountry, professional help isn’t minutes away—it’s hours or even days distant. During the river incident, for example, extraction took four hours.
As a result, every treatment decision had to account for extended duration. Consequently, a bandage that works for thirty minutes in an ambulance must hold for four hours in the field.
The solution: establish a treatment timeline immediately. For instance, if evacuation will take four hours, plan interventions to last six. Ultimately, this safety margin fundamentally changes how you manage wounds, fractures, and shock.
2. Resource Constraint in First Aid Scenarios
In the wilderness, you can’t order supplies or call for equipment. Obviously, what you have is all you’ll get. Because of this, treatment must shift from equipment-based thinking to principle-based thinking.
In engineering, this approach is called first-principles thinking—focusing on function rather than specific tools. Instead of memorizing tools, you focus on function. Rather than asking, “Where’s the Israeli bandage?” you ask, “How do I maintain steady pressure with materials that won’t slip?”
Once you understand the principle, improvisation becomes obvious.
3. Environmental Constraint in First Aid Management
Meanwhile, the environment actively works against you. Rain loosens bandages. Cold accelerates shock. Darkness limits visibility. Similarly, uneven terrain complicates stabilization.
The corporate parallel: managing crises in degraded conditions. In my previous career, we called this “graceful degradation”—designing systems that continue functioning even when conditions deteriorate. Likewise, your wilderness first aid approach must do the same.
The Systematic Wilderness First Aid Risk Management Assessment: MARCH Protocol
Before treating any injury in the wilderness, you must perform a systematic assessment. In tactical medicine, they use the MARCH protocol—a framework that’s equally applicable in wilderness scenarios. Specifically, I’ve adapted it for backcountry conditions:
M – Massive Hemorrhage: First Aid Risk Assessment
Clearly, life-threatening bleeding kills in minutes. Therefore, this is your first assessment priority, period. For example, in the case described, his compound fracture was bleeding heavily but not arterially. Specifically, it was venous bleeding—dark red, steady flow. In contrast, arterial bleeding would have been bright red, spurting with pulse.
Assessment decision tree:
- Spurting blood? → Arterial → Immediate direct pressure + improvised tourniquet if limb
- Flowing steadily? → Venous → Direct pressure + elevation
- Oozing or seeping? → Capillary → Direct pressure sufficient

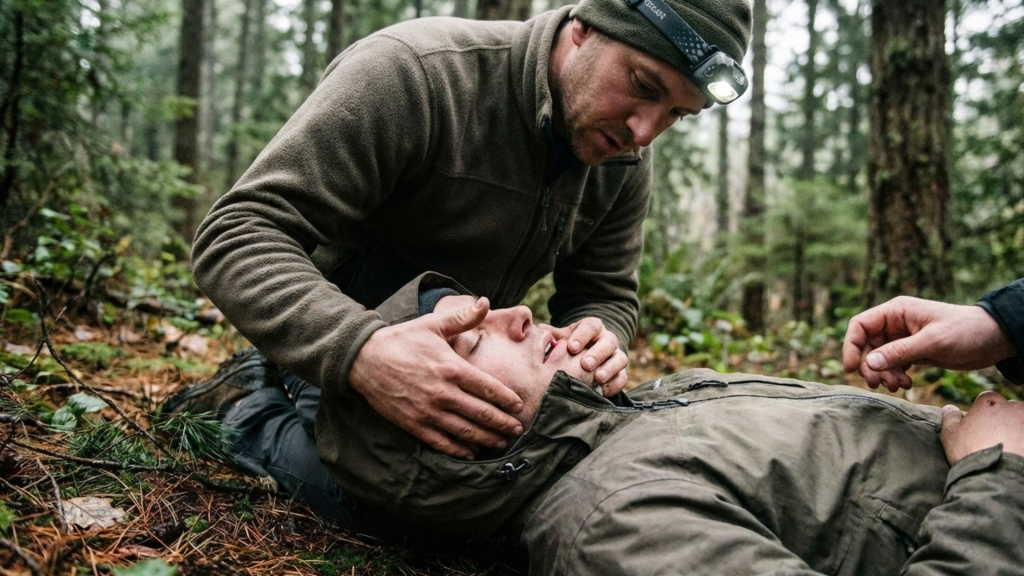
A – Airway: First Aid Priority
Can the patient breathe? Admittedly, this sounds obvious, but shock, panic, or positional issues can compromise airways quickly. In wilderness contexts, watch for:
- Tongue falling back in unconscious patients
- Vomit causing obstruction
- Swelling from insect stings (anaphylaxis)
- Spinal injury requiring careful positioning
R – Respiration: Risk Evaluation
Breathing present doesn’t mean breathing effective. Instead, look for:
- Respiratory rate (normal: 12-20 breaths/minute)
- Depth of breathing (shallow = problem)
- Chest rise symmetry (one side not moving = collapsed lung potential)
- Skin color (blue/gray = insufficient oxygenation)
C – Circulation: First Aid Monitoring
Check pulse and perfusion. In wilderness medicine, you’re watching for shock development:
- Pulse rate (normal: 60-100 bpm; >100 = concerning)
- Pulse strength (weak/thready = shock developing)
- Capillary refill (press fingernail, release—should pink up within 2 seconds)
- Skin temperature and moisture (cold, clammy = shock)
H – Head/Hypothermia: First Aid Assessment
Finally, check for head injuries and assess temperature regulation. In wilderness contexts, hypothermia is a silent killer that compounds every other injury. For instance, the guy was lying on cold ground with shock setting in and wet clothing, losing core temperature at an alarming rate—even though ambient temperature was 45°F.
This systematic assessment took approximately 90 seconds. More importantly, this approach prevents missed injuries. Remember, in a wilderness emergency, a systematic approach is more effective than rushing.
Treating the Eight Most Common Injuries: Wilderness First Aid Risk Management Strategies
Here are some of the systematic treatment approaches for the injuries you’re most likely to encounter, using only natural materials and basic improvisation.
1. Lacerations and Deep Cuts: First Aid Risk Management
The Scenario: Knife slips during food prep. Two-inch laceration on palm, bleeding heavily.
Immediate First Aid Actions for Risk Management
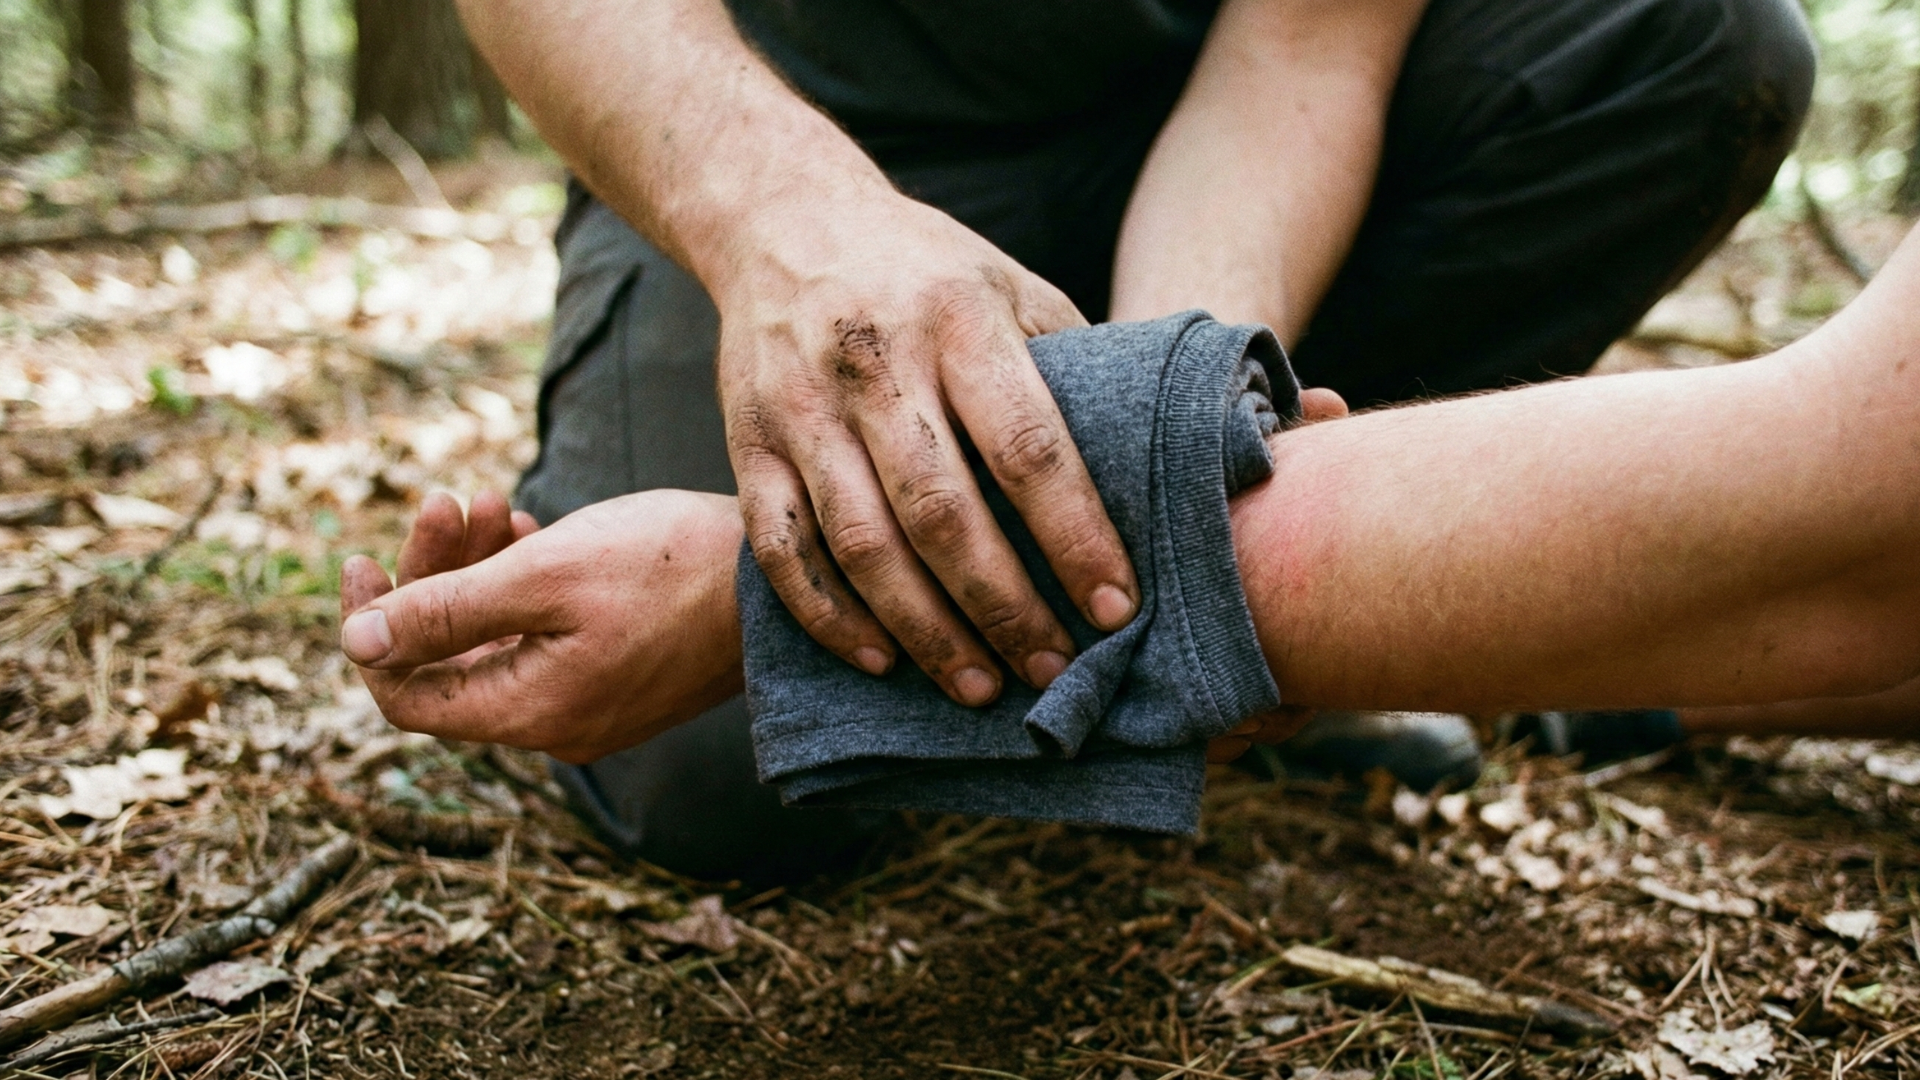
Direct pressure first. Not with your bare hand—use any clean fabric as a barrier. T-shirt, bandana, or even moss if necessary (more on that below). Furthermore, apply firm, sustained pressure for a minimum of 5 minutes without checking.
A common mistake is lifting the fabric every 30 seconds to “check” the wound, which disrupts clot formation. In fact, each check disrupts clot formation. In my corporate days managing industrial accidents, we saw this constantly—well-meaning responders actually prolonging bleeding by not maintaining pressure.
Improvised Wound Cleaning: First Aid Risk Assessment
Once bleeding is controlled, wound cleaning becomes critical. Without antiseptic:
- Best option: Boiled and cooled water. Boil for 5 minutes, cool to body temperature.
- Second option: Running stream water (if visibly clear). By nature, flowing water is self-cleaning
- Emergency option: Your own urine. Yes, I’m serious. Fresh urine is sterile and better than contaminated water.

Flush the wound thoroughly. Debris in wounds causes infection far more often than bacteria. Importantly, use volume—at least a liter of water for significant lacerations.
Improvised Wound Closure: Field First Aid
Without sutures or butterfly bandages, you still have three effective field options
Duct tape butterflies: Cut thin strips of duct tape (if available). Next, create butterfly-style closures by sticking to dry skin on both sides of wound, pulling edges together. Not medical-grade, but remarkably effective for 24-48 hours.
Sap adhesive method: Pine sap, once heated and cooled to tacky consistency, creates a natural adhesive. I’ve used this successfully for shallow lacerations. Heat small amount on rock near fire, test temperature carefully, apply to wound edges. However, this is not for deep wounds due to infection risk.
Pressure dressing only: For deep wounds, don’t attempt closure. Instead, pack with clean cloth, apply sustained pressure, and evacuate. Your goal is hemorrhage control, not cosmetic closure.
Natural Bandaging Materials
Ranked by effectiveness:
1. Moss (Sphagnum preferred): Naturally antimicrobial, highly absorbent. Used by militaries for centuries. Pack directly against wound after cleaning.
2. Inner bark (birch or willow): Soft, pliable, naturally antiseptic. Peel thin layers, boil if possible, apply as wound covering.
3. Clean cloth (any available): T-shirt, bandana, cut from clothing. Boil if time permits.
4. Cattail fluff: Highly absorbent, used historically as wound packing. Secondary choice due to potential contamination.

2. Fractures: Wilderness First Aid Risk Management for Breaks
Without question, a compound fracture can be one of the most serious injuries to manage in the field. Nevertheless, here’s the systematic approach that can stabilize someone for a four-hour evacuation.
Fracture Assessment in Wilderness First Aid Scenarios
Determine fracture type:
- Simple fracture: Bone broken, skin intact. Priorities: immobilization, pain management, evacuation.
- Compound fracture: Bone visible through skin. Priorities: hemorrhage control, wound protection, immobilization, shock prevention, urgent evacuation.
- Critical decision point: Do NOT attempt to realign visible bone. Your job is stabilization in position found, not reduction. In fact, reduction requires anesthesia and expertise you don’t have in the field.
Improvised Splinting: The SAM Principle
Without commercial splints, you’re applying the SAM principle—Stabilize Above and below, Maintain position. For the river crossing incident, it was a forearm fracture:

Step 1: First, control bleeding. Apply pressure dressing over compound wound site. Use a clean T-shirt section, maintain pressure for 8 minutes until bleeding stops completely.
Step 2: Next, add rigid support. Immobilize wrist and elbow joints. You can use two straight branches approximately 18 inches long, diameter of a broom handle. Strip bark, then create smooth surfaces.
Step 3: Critical step: add padding. Most people skip this. Place soft material (moss, folded fabric) between rigid splint and arm. Essentially, this prevents pressure sores and additional injury during transport.
Step 4: Now secure the splint. Use paracord at four points: above elbow, below elbow, above wrist, below wrist. Secure each with taut-line hitches for adjustability. Tie snugly but not tight—you should still be able to slip two fingers under cordage.
Step 5: Finally, check circulation. Verify pulse at wrist, check capillary refill in fingernails. Additionally, reassess every 15 minutes during evacuation.
Alternative Splinting Materials for Wilderness First Aid
Ranked by rigidity and availability:
- Trekking poles (excellent—already smooth, lightweight)
- Straight branches (most common)
- Rolled newspaper or magazine (surprisingly rigid when rolled tightly)
- Sleeping pad sections (cut and rolled for light duty)
- Adjacent body part (buddy splinting—tape broken finger to adjacent finger)
3. Sprains and Strains: First Aid Risk Management Without Ice
Ankle sprains are the most common wilderness injury. Without ice, however, you adapt the RICE protocol to RECE: Rest, Elevate, Compress, Evacuate if severe.
Immediate Assessment: First Aid Risk Evaluation
Effective wilderness first aid risk management requires accurate severity assessment. Determine fracture type:
- Grade 1: Can bear weight, mild pain, minimal swelling → Continue with caution
- Grade 2: Difficult to bear weight, moderate pain, significant swelling → Modify plan
- Grade 3: Cannot bear weight, severe pain, major swelling → Evacuate
Cold Therapy Without Ice: First Aid Alternatives
In wilderness contexts, you rarely have ice. Fortunately, alternatives exist:

- Stream immersion: Cold stream water (below 50°F) provides excellent cooling. Apply 15 minutes on, 15 minutes off, repeat 3-4 times in first 2 hours.
- Wet cloth evaporation: Soak cloth in water, wrap injury, allow evaporation cooling. Admittedly less effective but better than nothing.
- Snow pack: If available, pack snow in waterproof bag or fabric. However, avoid direct snow contact with skin (frostbite risk).
Improvised Compression: First Aid Techniques
Compression reduces swelling and provides support. Without elastic bandages:
- Use any stretchy fabric—T-shirt material works. Cut in spiral strips.
- Wrap figure-eight pattern around ankle (for ankle sprains)
- Snug but not tight—same two-finger test as splinting
- Re-tighten as swelling develops
Pro technique: If you have duct tape, create a makeshift ankle brace by applying strips in figure-eight pattern over sock. Surprisingly, this is remarkably effective for mild-to-moderate sprains.
4. Burns: Wilderness First Aid Risk Management and Treatment
Campfire mishaps, stove accidents, and sun exposure create the majority of wilderness burns. Consequently, treatment depends entirely on classification.
Burn Classification: First Aid Risk Assessment
- First-degree: Skin red, painful, no blistering → Field treatment adequate
- Second-degree: Blistering, severe pain, pink/red → Field treatment possible, monitor closely
- Third-degree: White/charred, little pain (nerve damage) → Evacuate immediately
Immediate Cooling: First Aid Protocol

Cool the burn immediately—this single action determines healing outcome:
- First, immerse in cool water (not ice water) for minimum 10 minutes
- If water is scarce, use wet cloth changed frequently
- Continue cooling until pain significantly decreases
Natural Burn Treatment: Wilderness First Aid
Honey (if available): Natural antimicrobial. Apply thin layer to clean burn. In fact, studies show honey reduces infection and promotes healing.
Aloe vera: If you can identify the plant, split the leaf and then apply gel directly. Excellent cooling and healing properties.
Plantain leaves (Plantago): Common trail weed. Crush fresh leaves to release juices, apply to minor burns. Natural anti-inflammatory.
Clean cloth covering: At minimum, protect burn from contamination with clean, dry cloth. Change daily if multi-day situation.
Critical Don’ts
- Don’t pop blisters – this creates an infection highway into the wound
- Avoid butter, oil, or grease – these substances trap heat in the tissue
- Skip direct ice application – ice causes additional tissue damage
- Stay away from adhesive bandages – removal will be extremely painful
5. Hypothermia: Critical First Aid Risk Management
Hypothermia wasn’t the primary issue with the guy in the river crossing incident, but it became his most dangerous complication. Specifically, shock, wet clothing, and cold ground were dropping his core temperature faster than the fracture was threatening him.
Recognition Stages: First Aid Evaluation
- Mild (98-95°F): Shivering, cold extremities, minor confusion
- Moderate (95-90°F): Violent shivering, difficulty speaking, stumbling
- Severe (<90°F): Shivering stops, unconsciousness, life-threatening
Prevention is always better than treatment. [Learn essential cold-weather preparation strategies](https://wildsurvival101.com/survive-the-cold-7-must-know-winter-camping-essentials-beyond-the-basics/) to avoid hypothermia in the first place. Field Rewarming Protocol for First Aid Management
- Stop heat loss immediately: Remove wet clothing, insulate from ground, create wind barrier
- Add external heat sources: Body-to-body contact (most effective, notably), warm water bottles in armpits/groin, fire warmth
- Calories are crucial: Provide warm sugary drinks if conscious (hot chocolate, sugar water)
- Handle with extreme care: Rough movement can trigger cardiac arrest in severe cases
For instance, team members created a ground insulation layer with pine boughs, stripped his wet clothing, wrapped him in dry layers from other packs, and positioned two team members on either side for body heat transfer.

6. Blisters: First Aid Risk Management Through Prevention
Blisters seem minor until they prevent evacuation. In fact, experienced hikers have been unable to walk due to untreated hotspots that became debilitating blisters.
The Hotspot Protocol: First Aid Prevention
Feel friction or heat developing on feet? Stop immediately. Crucially, this is your prevention window:
- Apply duct tape directly to hotspot (single best prevention)
- Adjust sock layers (add or remove)
- Modify lacing to reduce pressure point
Established Blister Treatment: First Aid Approach

If a blister has already formed:
Intact blister (not popped): Create donut-shaped padding around blister to remove pressure. Cut moleskin or duct tape with hole for blister, apply around it. The goal is to protect the fluid-filled sac while distributing pressure around it.
Torn blister: First, clean thoroughly with boiled water. Next, trim loose skin carefully with clean knife or scissors. Then, apply thin layer of honey or antibiotic ointment if available. Cover with non-stick padding. Change daily.
7. Insect Stings: First Aid Risk Management for Anaphylaxis
Most stings are minor irritants. However, your concern is anaphylaxis—a life-threatening allergic reaction.
Anaphylaxis Warning Signs: First Aid Recognition
Immediate evacuation required if:
- Difficulty breathing/wheezing
- Swelling of face, lips, or throat
- Rapid pulse with dizziness
- Hives spreading beyond sting site
- Nausea/vomiting with respiratory symptoms
Field Treatment for Normal Reactions: First Aid Steps
- Remove stinger if present (scrape sideways with credit card or knife blade—don’t pinch)
- Cold compress (stream water, wet cloth) for 15-20 minutes
- Plantain leaf poultice (if identified correctly)
- Elevate if extremity affected
8. Dehydration: First Aid Risk Management
Dehydration doesn’t just make you thirsty—instead, it degrades decision-making, coordination, and thermoregulation. Furthermore, in wilderness medicine, dehydration compounds every other injury.
Recognition: First Aid Dehydration Assessment
The urine color chart (memorize this):
- Clear to pale yellow → Well hydrated
- Yellow → Adequate
- Dark yellow → Mildly dehydrated (drink now)
- Amber/brown → Severely dehydrated (urgent)
Field Rehydration Strategy: First Aid Solutions

Oral rehydration solution (ORS) without packets:
- 1 liter clean water
- 6 teaspoons sugar (or honey)
- ½ teaspoon salt
This homemade ORS provides electrolyte replacement superior to plain water. Additionally, sip steadily rather than gulping—absorption is more effective.
The Wilderness First Aid Risk Management Decision Matrix: When to Evacuate
In wilderness first aid, the hardest decision isn’t how to treat an injury—it’s knowing when to evacuate. This is precisely where corporate risk management frameworks prove invaluable.
Immediate Evacuation Criteria: First Aid Risk Assessment
These conditions demand immediate evacuation, no discussion:
- Uncontrolled bleeding after 15 minutes direct pressure
- Suspected spinal injury
- Head injury with loss of consciousness
- Difficulty breathing
- Signs of anaphylaxis
- Compound fractures
- Altered mental status
- Chest pain
- Signs of internal bleeding (rigid abdomen, progressive weakness)
The First Aid Risk-Benefit Calculation for Evacuation
For non-immediate situations, I use a systematic risk assessment:
- Can the injury worsen significantly in the time required to complete the trip? This first consideration evaluates progression risk.
- Does continuing expose the patient or team to unacceptable additional risk? Secondary hazards often compound the primary injury.
- Is the patient capable of self-evacuation with assistance? Mobility assessment determines extraction logistics.
- What are weather and daylight constraints on evacuation timing? Environmental factors may force immediate action even for moderate injuries.
If answers indicate growing risk, evacuation timing becomes critical. Remember: Whatever you do, don’t wait for ’emergency’ status—proactive evacuation is safer than reactive rescue.
Conclusion: Knowledge is Your Most Reliable Tool
The guy mentioned above made a full recovery. Eight hours after his injury, he was in a trauma center receiving professional care. The compound fracture required surgery, but fortunately, because we managed hemorrhage, prevented shock, immobilized effectively, and maintained his core temperature, he suffered no complications beyond the primary injury.
The Principle-Based Approach
The techniques I’ve shared aren’t theoretical—In reality, they’re field-tested wilderness first aid risk management protocols developed through corporate risk management training and real wilderness emergencies. Moreover, every improvisation, every natural material, every decision framework has been validated in actual backcountry conditions.
The key insight: wilderness first aid without a kit isn’t about memorizing procedures. Rather, it’s about understanding principles. When you grasp why direct pressure stops bleeding, you can apply it with a bandana, moss, or your hand. Similarly, when you understand fracture stabilization principles, you can splint with branches, poles, or rolled magazines.
Your Action Plan
- This week: Practice improvised bandaging with t-shirt material
- This month: Take a wilderness first aid certification course (Wilderness Medical Associates offers comprehensive training)
- Before next trip: Practice splinting with natural materials in your backyard
- Always: Carry a comprehensive first aid kit—improvisation is your backup, not your plan. Learn what emergency medical responders pack for backcountry emergencies.
Final Thoughts
Remember: the best wilderness first aid scenario is the one that never happens. Preparation, risk assessment, and sound judgment prevent most injuries before they occur. However, when prevention fails, systematic thinking and improvised solutions can save lives.
You’re now equipped with the wilderness first aid risk management frameworks that bridge corporate risk management with backcountry medicine. Above all, practice these skills before you need them, and you’ll handle emergencies with the same systematic calm that defines professional decision-making.